2018年4月26日 星期四

VSAN 升級至 6.5 --搭建 VSAN 升級測試環境


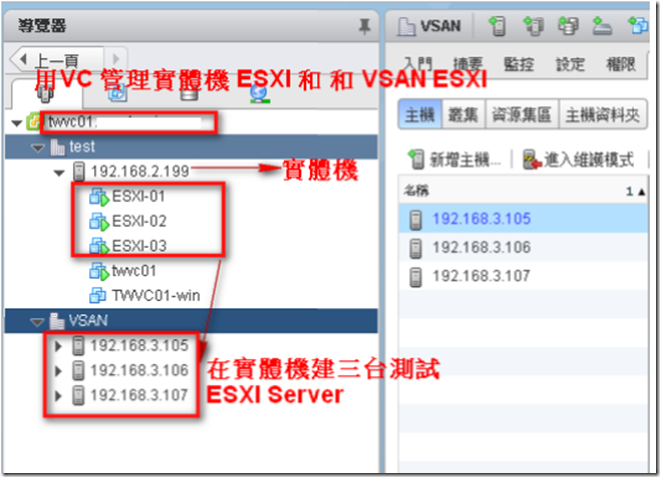
在 ESXI 實體主機上,再建立 三台 ESXI ,測試 VSAN升級

相關 IP 配置如下:

192.168.3.27 -- VCSA   -- twvc01    https://192.168.3.27:5480

192.168.2.199 -- ESXI

---VSAN

192.168.3.105 -- ESXI-01  (6GB) -- 設定 VSAN 最少要 6GB,不然無法設定

192.168.3.106 -- ESXI-02  (6GB)

192.168.3.107 -- ESXI-03  (6GB)

192.168.3.32 -- ESXI-01  VSAN 網路 IP

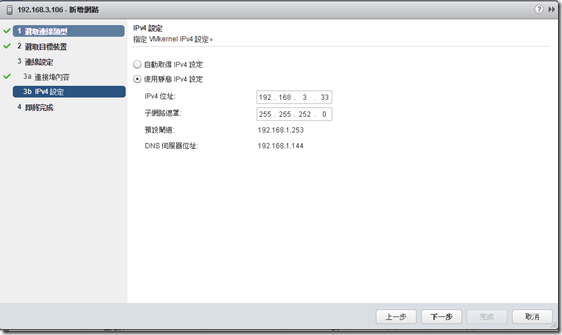
192.168.3.33 -- ESXI-02 VSAN 網路 IP

192.168.3.34 -- ESXI-03 VSAN 網路 IP

192.168.3.135 -- VCSA  --VSAN

192.168.2.145 -- Guest VM


測試架構如下:
Image(88)

開啟  巢狀虛擬機架構

如果在 ESXI 上建立 VM , 發現下列錯誤

Image(51)

1.確認 CPU 是否有啟用 Intel VT-d

1. Reboot or switch On the server.

2. Press the F9 key on the keyboard during POST.

3. Within the RBSU screen navigate to the following menu: System Options -> Processor Options -> Intel VT-d.

4.Enable or Disable the Intel(R)VT-d as required. By default it is Enabled.

5. Save the RBSU settings by pressing F10 key.

6. Reboot the server and the changes will be activated.

Image(52)

Image(53)

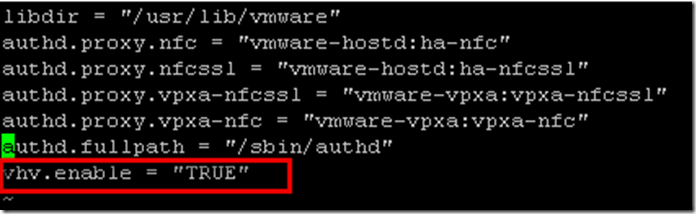
2.在實體機的 ESXI ,編輯 /etc/vmware/config 加入以下 vhv.enable = "TRUE"
Image(54)

3.檢查 CPU 的支援設定為 「自動」

Image(55)


啟用 VSAN 需要網路 和 DISK 先設定

要按照建立順序,若先建 Disk Group 再用網路,會找不到 Disk Group

1.建立 vsan vmkernel

2.創建 vsan cluster

3.創建 Disk Group


設定 VSAN 網路 設定

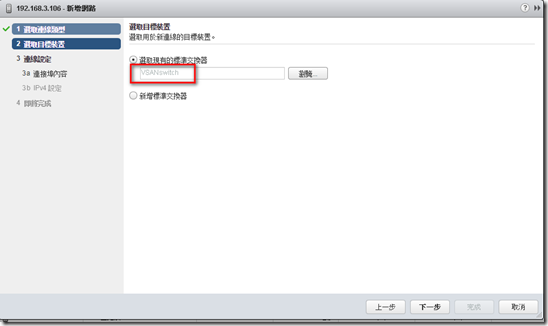
先在各 ESXI 新增一個 虛擬交換器 VSANswitch

Image(56)

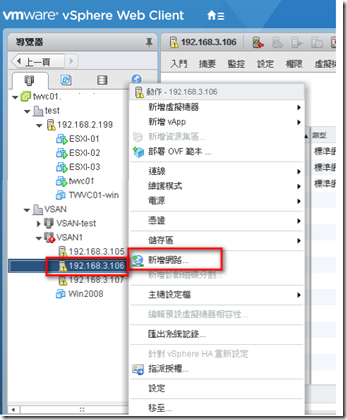
新增網路

Image(89)

Image(58)

Image(59)

新增一個 VMKernerl VSAN-net ,啟用的服務 要選 VSAN

Image(60)

Image(61)

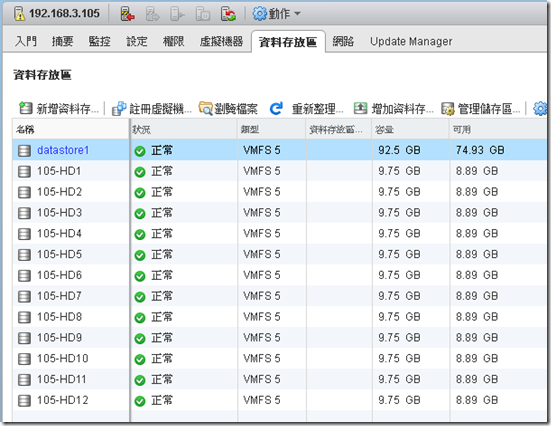
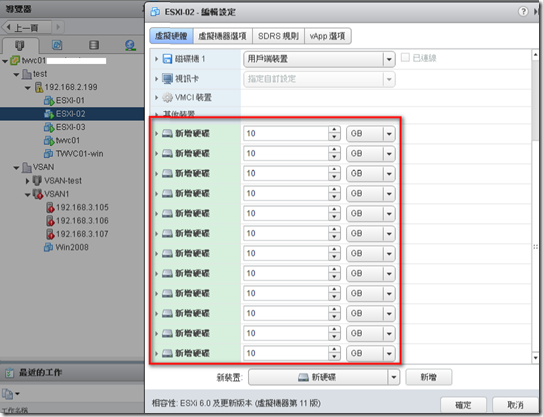
在每台ESXI 添加 12 顆 HD,預計增加三個 Disk Group

先在每台 ESXI 添加 12 顆 10  GB HD 
Image(90)

再將每顆 HD ,格式化成 VMFS 格式

Image(91)

Image(64)


三台 ESXI 都加完 HD 後,因為是測試,所以沒有 SSD ,要將其中 3 顆 指定成 SSD

1.請執行指令「esxcli storage nmp satp rule add --satp VMW_SATP_LOCAL --device」,加上 SSD 固態硬碟的 Device ID mpx.vmhba1:C0:T9:L0 ,最後加上參數 「--option=enable_ssd」即可。

2.指令執行完成後,再以「esxcli storage nmp satp rule list | grep enable_ssd」指令,確認一下是否設定正確。

3.再執行「esxcli storage core claiming reclaim -d mpx.vmhba1:C0:T9:L0」指令,將 SSD 固態硬碟先回收及重新宣告硬碟的動作。


將 HD 指定成 SSD步驟如下:

列出 ESXI 所有 HD

esxcli storage core device list 

Image(65)

1.挑出三顆剛剛建立的 HD ,確認 SSD 狀態是 false

esxcli storage core device list --device=mpx.vmhba1:C0:T9:L0


2.將剛剛選出的三顆 HD,指定成 SSD

esxcli storage nmp satp rule add --satp VMW_SATP_LOCAL --device mpx.vmhba1:C0:T9:L0 --option=enable_ssd

esxcli storage nmp satp rule add --satp VMW_SATP_LOCAL --device mpx.vmhba1:C0:T8:L0 --option=enable_ssd

esxcli storage nmp satp rule add --satp VMW_SATP_LOCAL --device mpx.vmhba1:C0:T7:L0 --option=enable_ssd


3.確認有哪些 HD,被指定成 SSD

esxcli storage nmp satp rule list | grep enable_ssd

Image(66)


4.將 SSD 固態硬碟先回收及重新宣告硬碟的動作

esxcli storage core claiming reclaim -d mpx.vmhba1:C0:T9:L0

若想將SSD重新恢復至HDD,則執行

esxcli storage nmp satp rule remove --satp VMW_SATP_LOCAL --device="mpx.vmhba0:C0:T1:L0"


建一個 Cluster ,加入 三台 ESXI 主機

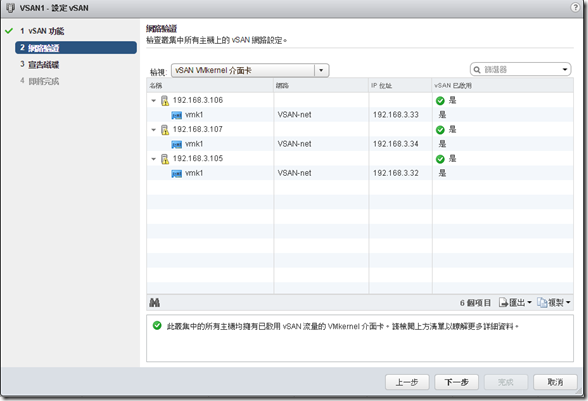
設定 VSAN

Image(67)

Image(68)

Image(69)

如果抓到 HD,按照下面方法,刪除 Disk Partition 

partedUtil get /vmfs/devices/disks/mpx.vmhba1:C0:T8:L0

partedUtil delete /vmfs/devices/disks/mpx.vmhba1:C0:T1:L0 1
Image(70)

若還是抓不到,將 ESXI 重開機。

可以看到,已經可以抓到 HD 了

Image(71)

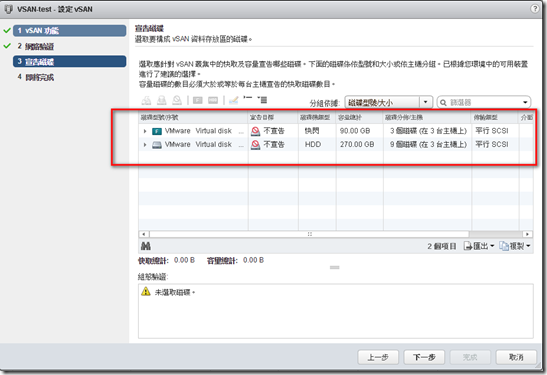
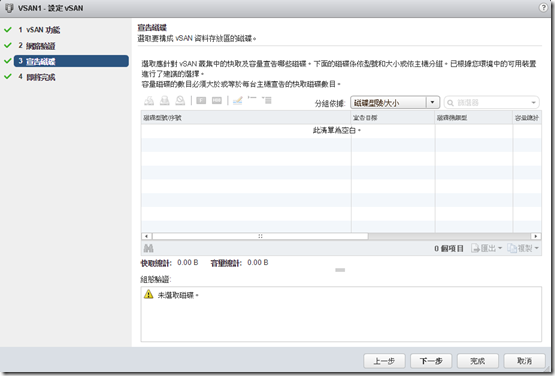
把 SSD HD 宣告成 快取層

Image(72)

再把 一般 HD 宣告成 容量層

Image(73)

Image(74)

vSAN 到此已設定完成。

可以看看 是否有什麼錯誤

Image(82)


若是設定過程中, DISK 無法加入 VSAN

Image(75)

請確認 在 實體 ESXI 主機的 VSwitch 上,

啟用 混合模式(promiscuous mode )偽造的傳輸 (forged transmits )

Image(81)


2018年4月19日 星期四

VSAN 升級至 6.5 -- 升級前相關檢查


image
V3到V5不需要重建 Disk Group

升級流程
1. vSAN升級評估 - 明確升級的⽬標,確認相容性
2. 備份相關配置 - 包括vCenter和ESXi
3. 升級vSAN前檢查 - 確認升級前vSAN的健康狀態
4. 升級vCenter - 需要先升級vCenter
5. 升級ESXi主機 - vCenter升級完成後升級ESXi主機
6. 檢查vSAN狀態 - 格式升級前,需要檢查vSAN狀態,包括升級相關硬體的 Driver
7. 升級Disk Format - 有可能涉及到資料移轉
8. 升級vSAN後檢查 - 確認升級完成後vSAN的狀態


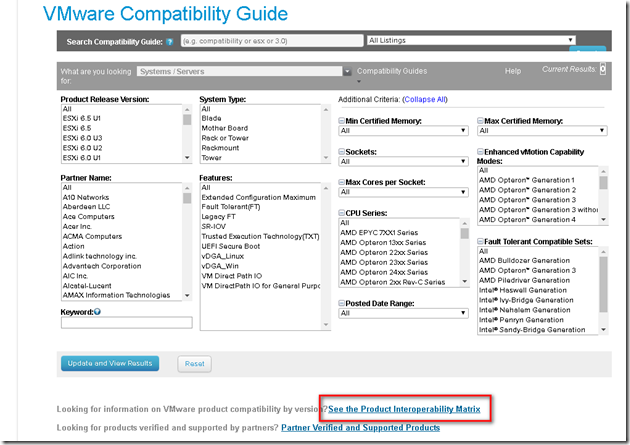
確認產品的 Interoperability Matrices


https://www.vmware.com/resources/compatibility/search.php
從 VMware Compatibility Guide 網站,點選 See the Product Interoperability Matrix
Image
https://www.vmware.com/resources/compatibility/sim/interop_matrix.php#interop&1=&100=
確認  ESXI 支援 VSAN 的各版本升級相容性
Image [1]
vCenter Server各版本升級相容性
Image [2]


image

  • 在升級過程中,vSAN 主機之間依舊會使⽤  Multicase  進⾏溝通,直到所有的主機都升級到vSAN6.6或更⾼(格式為3.0以及之前的版本)。
  • vSAN 6.6 主機之間會使⽤   UniCast  進⾏溝通,如果此時有新的主機加⼊Cluster,⽽該主機上安裝了vSAN6.6之前的版本(例如vSAN6.2),那麼vSAN Cluster會切換到 Multicase 進⾏溝通。
  • 此時vSAN Cluster 中如果有任意⼀個主機的格式升級到5,整個 vSAN Cluster會使⽤ UniCast 進⾏溝通。


VSAN 環境升級前 檢查
在vSAN升级前,我们需要確認以下事情:
• 目前的環境中,vSAN、ESXi 和 vSphere 升級的相容性沒有問題。
• 所有的 vSAN DISK 是健康的。
• 所有的物件都是可以訪問的。
• 没有資料正在同步。

1.登入每一台 ESXI  ,用  esxcli vsan cluster get  確認 VSAN 成員數量是否正確。
Image [3]
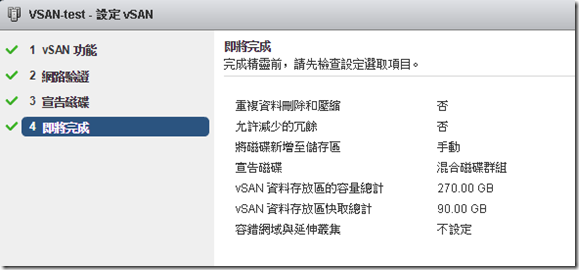
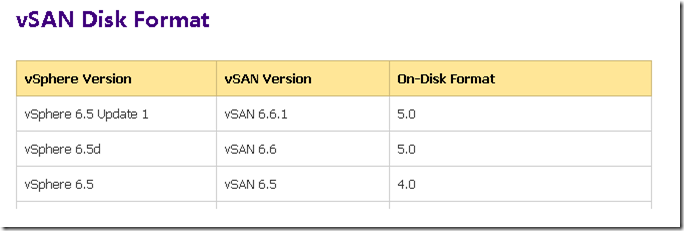
2.vSAN中 -- 將磁碟新增至儲存區 是 手動 , 重複資料刪除和壓縮 的功能是 已停用。vSAN磁碟格式 是 V3
Image [4]
3.檢查 Disk Manager 裡面 Disk Group 的狀況
VSAN 健全狀況狀態 是 狀況良好
網路磁碟分割群組 是 群組1 -- 若是 不同版本的 VSAN 或磁碟格式會造成不同的 群組
磁碟格式版本 是 3
Image [5]
4.確認 VSAN 健康檢查中 沒有異常
Image [6]
5.確認 HD 使用率,建議 最少還有 保留 30 % 空間
可以登入 Vcneter 進入 RVC 用 vsan.resync_dashboard 看狀況
Image [7]
6.確認沒有在同步的物件,也沒有不可存取的物件
Image [8]
Image [9]

7. 執行前,先去機房 放幾包 乖乖


2018年4月3日 星期二

ESXI 6.0 VSAN 添加 第三組 DISK Group 失敗,造成IOPS 異常


VSAN 添加 第三組 DISK Group 失敗,造成IOPS 異常

因為會一直嘗試 Mount 異常的 HD,造成整個 VSAN crash


添加 DISK Group 失敗

Image(3)

發現慢到連 VC 都無法登入

上面的 VM GUEST 都慢到掛了

Image(4)


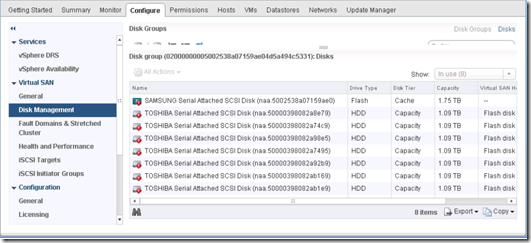
登入 ESXI ,確認 HD的 狀態,可以看到有五顆 HD 異常

[root@VM:~] localcli vsan storage list |grep CMMDS

   In CMMDS: true

   In CMMDS: true

   In CMMDS: true

   In CMMDS: true

   In CMMDS: true

   In CMMDS: true

   In CMMDS: true

   In CMMDS: true

   In CMMDS: true

   In CMMDS: true

   In CMMDS: true

   In CMMDS: false

   In CMMDS: false

   In CMMDS: true

   In CMMDS: true

   In CMMDS: true

   In CMMDS: false

   In CMMDS: false

   In CMMDS: true

   In CMMDS: true

   In CMMDS: true

   In CMMDS: true

   In CMMDS: false

   In CMMDS: true

照群組,列出有異常的 HD,

[root@VM:~] localcli vsan storage list |grep "CMMDS: false" -B6 |grep naa

   Display Name: naa.50000398082a98e5

   VSAN Disk Group Name: naa.5002538a07159ae0

   Display Name: naa.50000398082a92b9

   VSAN Disk Group Name: naa.5002538a07159ae0

   Display Name: naa.50000398082ab1e9

   VSAN Disk Group Name: naa.5002538a07159ae0

   Display Name: naa.50000398082a7495

   VSAN Disk Group Name: naa.5002538a07159ae0

   Display Name: naa.50000398082ab169

   VSAN Disk Group Name: naa.5002538a07159ae0

將這個異常的 Disk Group Unmount

[root@VM:~] esxcli vsan storage diskgroup unmount -s naa.5002538a07159ae0

unmount 後,可以發現這些 HD 都顯示異常,再將顯示為 unmont 的 Disk Group 刪除

Image(5)


建議:

HD 若不確定裡面是否有資料,建議要做 Erase Partitions ,將HD 清空

可以點 Turn Locator LED on 來判斷 實體 HD,避免出錯

Image(6)


原因 

https://kb.vmware.com/s/article/2146495

The issue of disk group creation failure on a vSAN ESXi host occurs under these conditions:

  • There are 3 or more disk groups per ESXi host.
  • There are large cache tier drives with a capacity of approximately 1TB or greater.
  • 剛好要在ESXI 上添加 第三組 Disk Group
  • SSD 1.9 TB,大於 1TB

解決方案 -- 


This issue is resolved in these releases:

To work around this issue, increase the heap memory size on the ESXi host with these steps:

  1. Connect to the affected ESXi host with an SSH session.
  2. Run this command:
    esxcfg-advcfg -s 1024 /LSOM/heapSize
    Note: This will change the default heap memory size from 256 to 1024
  3. Reboot the ESXi host.
  4. Attempt the Disk group creation again.

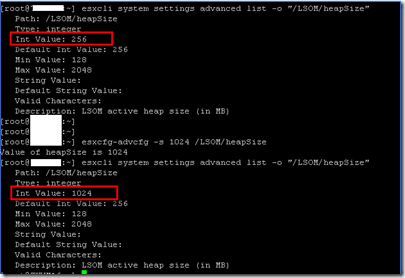
下指令前,先確認目前參數設定

esxcli system settings advanced list -o "/LSOM/heapSize"

Image(7)

下指令後,再確認目前參數設定 ,已變更成 1024

esxcfg-advcfg -s 1024 /LSOM/heapSize

Image(8)


Disk Group 添加成功,每顆 HD 看來都正常

Image(9)

[root@VM:/var/log] esxcli vsan storage list |grep CMMDS

   In CMMDS: true

   In CMMDS: true

   In CMMDS: true

   In CMMDS: true

   In CMMDS: true

   In CMMDS: true

   In CMMDS: true

   In CMMDS: true

   In CMMDS: true

   In CMMDS: true

   In CMMDS: true

   In CMMDS: true

   In CMMDS: true

   In CMMDS: true

   In CMMDS: true

   In CMMDS: true

   In CMMDS: true

   In CMMDS: true

   In CMMDS: true

   In CMMDS: true

   In CMMDS: true

   In CMMDS: true

   In CMMDS: true

   In CMMDS: true

PowerShell-DSC 學習筆記 -- 用 DSC 更新 Windows Patch


1.在開始之前,請先確認 各 Windows 作業系統的 WMF 可用性
https://docs.microsoft.com/zh-tw/powershell/wmf/readme
image

若之前有安裝 WMF 3.0 ,須先移除 再安裝 WMF 5.1

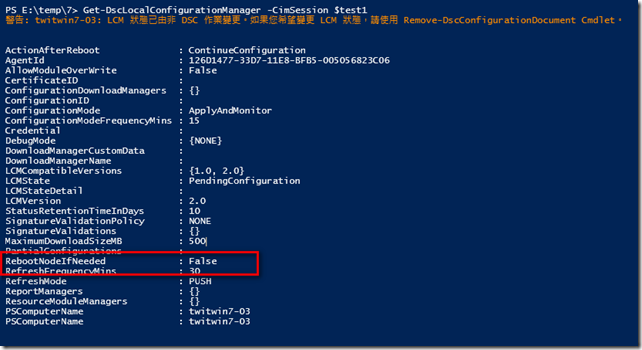
2.把 RebootNodeIfNeeded 設定為 True,這樣更新完成後,如果有需要重新開機,就會自動重開機。
安裝完hotfix後,並不會自動重開機
查看Read ME文件,裡面有表示 RebootNodeIfNeeded 須為 True , 才會重開機
使用 Get-DscLocalConfigurationManager -CimSession $test1 查看
Image
使用下面的設定,把  RebootNodeIfNeeded 設定為 True

Configuration ConfigureRebootOnNode
{
param (
[Parameter(Mandatory=$true)]
[ValidateNotNullOrEmpty()]
[String]
$NodeName
    )
Node $NodeName
    {
LocalConfigurationManager
        {
            RebootNodeIfNeeded = $true
        }
    }
}
Write-Host "Creating mofs"
ConfigureRebootOnNode -NodeName twitwin7-03 -OutputPath .\rebootMofs
Write-Host "Starting CimSession"
$pass = ConvertTo-SecureString "SCOMej03xu35k3" -AsPlainText -Force
$cred = New-Object System.Management.Automation.PSCredential ("coretronic\opsaction", $pass)
$cim = New-CimSession -ComputerName twitwin7-03 -Credential $cred
Write-Host "Writing config"
Set-DscLocalConfigurationManager -CimSession $cim -Path .\rebootMofs -Verbose

3.下載 DSC Module
Install-Module -Name xWindowsUpdate
Install-Module -Name xPendingReboot
Image(1)

4.設定 DSC
#MOF 文件設定
configuration WSUS-Reboot {
Import-DscResource -ModuleName xWindowsUpdate
Node twitwin7-03 {
xWindowsUpdateAgent MuSecurityImportant {
            Category = @('Security','Important','Optional')
            IsSingleInstance = 'Yes'
            Source = 'WindowsUpdate'
            UpdateNow = $True
        }
    }
Node twitwin7-03 {
xPendingReboot Reboot1
          {
            Name = 'BeforeSoftwareInstall'
          }
LocalConfigurationManager
               {
             RebootNodeIfNeeded = $True
               }
       }
}
#匯出 MOF 檔案
WSUS-Reboot -OutputPath E:\temp\7
#執行
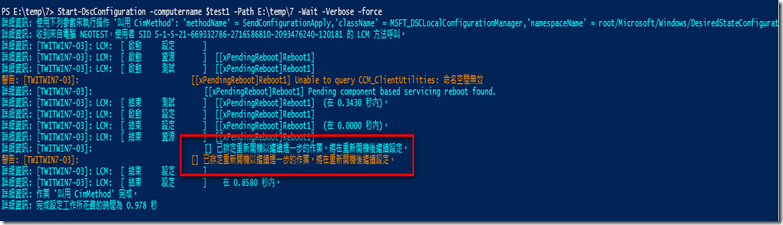
Start-DscConfiguration -computername twitwin7-03 -Path E:\temp\7 -Wait -Verbose -force

Start-DscConfiguration -computername twitwin7-03 -Path E:\temp\7 -Wait -Verbose -force
詳細資訊: 使用下列參數來執行操作 '叫用 CimMethod': 'methodName' = SendConfigurationApply,'className' = MSFT_DSCLocalConfigurationManager,'namespaceName' = root/Microsoft/Windows/DesiredStateConfiguration。
詳細資訊: 收到來自電腦 NEOTEST,使用者 SID S-1-5-21-669332786-2716586810-2093476240-120181 的 LCM 方法呼叫。
詳細資訊: [TWITWIN7-03]: LCM:  [ 啟動     設定       ]
詳細資訊: [TWITWIN7-03]: LCM:  [ 啟動     資源       ]  [[xWindowsUpdateAgent]MuSecurityImportant]
詳細資訊: [TWITWIN7-03]: LCM:  [ 啟動     測試       ]  [[xWindowsUpdateAgent]MuSecurityImportant]
詳細資訊: [TWITWIN7-03]:                            [[xWindowsUpdateAgent]MuSecurityImportant] TryGet RebootRequired...
詳細資訊: [TWITWIN7-03]:                            [[xWindowsUpdateAgent]MuSecurityImportant] Got rebootRequired: False
詳細資訊: [TWITWIN7-03]:                            [[xWindowsUpdateAgent]MuSecurityImportant] Searching for updating using: IsHidden=0 and IsInstalled=0
詳細資訊: [TWITWIN7-03]:                            [[xWindowsUpdateAgent]MuSecurityImportant] Get default search service: 3da21691-e39d-4da6-8a4b-b43877bcb1b7
詳細資訊: [TWITWIN7-03]:                            [[xWindowsUpdateAgent]MuSecurityImportant] updateNow compliant: False
詳細資訊: [TWITWIN7-03]:                            [[xWindowsUpdateAgent]MuSecurityImportant] notifications compliant: True
詳細資訊: [TWITWIN7-03]:                            [[xWindowsUpdateAgent]MuSecurityImportant] service compliant: True
詳細資訊: [TWITWIN7-03]: LCM:  [ 結束     測試       ]  [[xWindowsUpdateAgent]MuSecurityImportant]  (在 55.1080 秒內)。
詳細資訊: [TWITWIN7-03]: LCM:  [ 啟動     設定       ]  [[xWindowsUpdateAgent]MuSecurityImportant]
詳細資訊: [TWITWIN7-03]:                            [[xWindowsUpdateAgent]MuSecurityImportant] TryGet RebootRequired...
詳細資訊: [TWITWIN7-03]:                            [[xWindowsUpdateAgent]MuSecurityImportant] Got rebootRequired: False
詳細資訊: [TWITWIN7-03]:                            [[xWindowsUpdateAgent]MuSecurityImportant] Searching for updating using: IsHidden=0 and IsInstalled=0
詳細資訊: [TWITWIN7-03]:                            [[xWindowsUpdateAgent]MuSecurityImportant] Get default search service: 3da21691-e39d-4da6-8a4b-b43877bcb1b7
詳細資訊: [TWITWIN7-03]:                            [[xWindowsUpdateAgent]MuSecurityImportant] updateNow compliant: False
詳細資訊: [TWITWIN7-03]:                            [[xWindowsUpdateAgent]MuSecurityImportant] notifications compliant: True
詳細資訊: [TWITWIN7-03]:                            [[xWindowsUpdateAgent]MuSecurityImportant] service compliant: True
詳細資訊: [TWITWIN7-03]:                            [[xWindowsUpdateAgent]MuSecurityImportant] Performing the operation "Set-TargetResource" on target "Install Updates".
詳細資訊: [TWITWIN7-03]:                            [[xWindowsUpdateAgent]MuSecurityImportant] Searching for updating using: IsHidden=0 and IsInstalled=0
詳細資訊: [TWITWIN7-03]:                            [[xWindowsUpdateAgent]MuSecurityImportant] Installing updates...
詳細資訊: [TWITWIN7-03]:                            [[xWindowsUpdateAgent]MuSecurityImportant] Found update: Microsoft Office 2010 (KB2553140) 32 位元版本 的更新
詳細資訊: [TWITWIN7-03]:                            [[xWindowsUpdateAgent]MuSecurityImportant] Found update: Microsoft Office 2010 (KB2956076) 32 位元版本 的安全性更新
詳細資訊: [TWITWIN7-03]:                            [[xWindowsUpdateAgent]MuSecurityImportant] Downloading updates...
詳細資訊: [TWITWIN7-03]:                            [[xWindowsUpdateAgent]MuSecurityImportant] Installing updates...
詳細資訊: [TWITWIN7-03]:                            [[xWindowsUpdateAgent]MuSecurityImportant] Checking for a reboot...
詳細資訊: [TWITWIN7-03]:                            [[xWindowsUpdateAgent]MuSecurityImportant] TryGet RebootRequired...
詳細資訊: [TWITWIN7-03]:                            [[xWindowsUpdateAgent]MuSecurityImportant] Got rebootRequired: True
詳細資訊: [TWITWIN7-03]:                            [[xWindowsUpdateAgent]MuSecurityImportant] A reboot was required
詳細資訊: [TWITWIN7-03]:                            [[xWindowsUpdateAgent]MuSecurityImportant] Performing the operation "Set-TargetResource" on target "Disable Microsoft Update Service".
詳細資訊: [TWITWIN7-03]:                            [[xWindowsUpdateAgent]MuSecurityImportant] Disable the Microsoft Update setting
詳細資訊: [TWITWIN7-03]: LCM:  [ 結束     設定       ]  [[xWindowsUpdateAgent]MuSecurityImportant]  (在 159.8550 秒內)。
詳細資訊: 作業 '叫用 CimMethod' 完成。
詳細資訊: 完成設定工作所花費的時間為 216.013 秒

可以觀察  ,目標 已經重開機
Image(2)